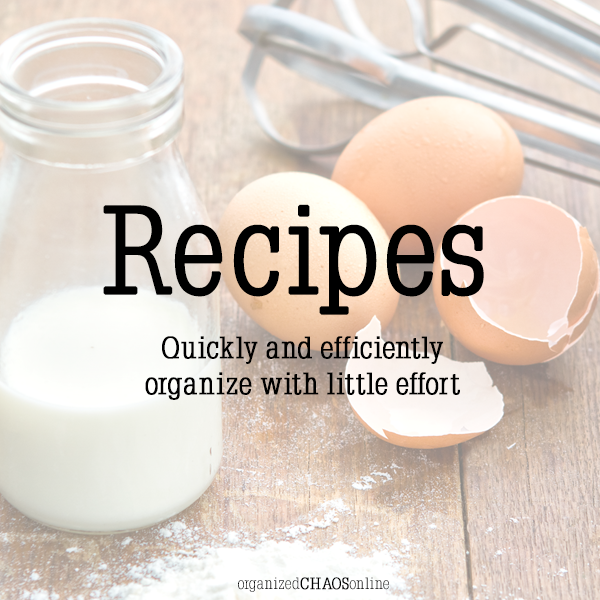
I have a cabinet full of recipe books but over time, I’ve collected random recipes from Pinterest, family members and magazines. I was shoving them into a folder because it looked organized. The problem was that every time I went to find something it was useless. I spent more time digging and then reorganizing into a folder than cooking the actual meal.
In keeping with the purging theme and respecting the fact that we all have about zero extra minutes per day, this recipe organization is quick, efficient and costs very little.
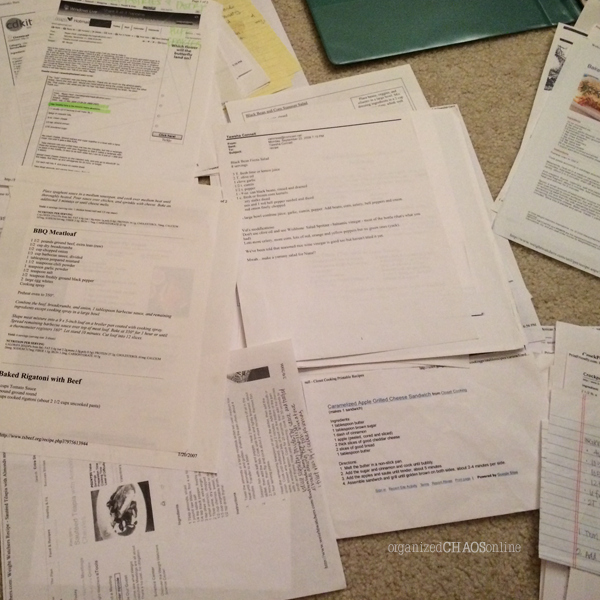
My recipes were gathered in one hot mess.

Then I stacked them in piles. The key to organizing anything is putting “like” with “like”. What do they have in common? Here, I stacked in recipes labeled chicken, pork, fish, salad, etc.
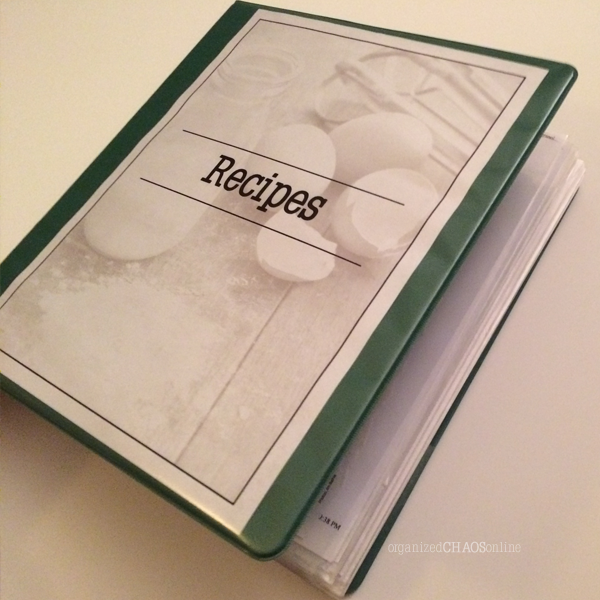
Now I need something to put them in. Ah, a binder with tabs to separate the types of recipes (the piles). I also grabbed some page protectors (not pictured).

Done deal. Just like my jeans, this binder can’t take one more recipe. I should have purchased a much bigger binder and another set of tabs. I also want white, not green. But, hey, this was a quick project so I can quickly access my recipes. Maybe later in the year, I’ll pretty it up. For now, I’ll eat.
TIP: Add extra page protectors to the binder so when you add to it, you can easily slip the new one in the correct place.
Aaaaand, the amount of time the project took (including Instagramming a picture) and grabbing not one but TWO drinks for my son, starting a movie and digging Play-Doh out of his dump truck was:

A 5-year old threw off my game. I mean, seriously. He gets thirsty while I’m working? The nerve.
Will this work for your recipe collection?

Note from Tawsha:
Each time I dive into an organization-type project, I have these big beautiful plans that, in the end, aren’t realistic. I want a great end result that is pleasing to my eye but not at the expense of losing efficiency – the reason I started the project in the first place. I see it everywhere and I, too, want a picture-perfect result. Well, for us, it’s just not the truth 100% of the time and we won’t hold back if it’s not perfect. We’re committing to offering a realistic approach to creating structure and order in life. We’re busy, you’re busy and none of us are made of money.
Your comments and feedback have been awesome. We will continue to strive to be true to you, true to ourselves and not just go for the pretty picture each time we post a new blog. Your trust is important to us.

We need motivation, and after reading your feedback, it sounds like you may need some too. Let’s help each other out.
We need to exercise, but with our crazy schedules, we know that committing ourselves to an exercise program that requires a chunk of time or a long-term commitment is setting ourselves up for failure. Sound familiar? We’ve found that exercising at home allows us to adjust our exercise times to our constantly changing schedules. We look for exercises that require a minimum of equipment, and produce quick results.
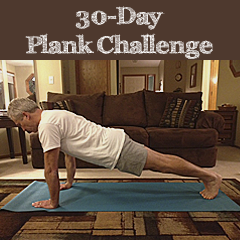
Our problem area? Abs. The best exercise we’ve found to strengthen the core that gives you ridiculously fast results is…The Plank.
What’s a “Plank”?
The plank (also called a front hold, hover, or abdominal bridge) is an isometric core strength exercise that involves maintaining a difficult position for extended periods of time. The most common plank is the front plank which is held in a push-up position with the body’s weight borne on forearms, elbows, and toes. -source: Wikipedia
[row][column size=”1/2″]
 [/column] [column size=”1/2″]
 [/column] [/row]
I was so embarrassed by the original photos of my side view, that my husband graciously allowed me to use him as a model.(Pleeeaase, join me in this challenge. I so need it!)
The plank engages and strengthens the muscles of the abdomen, back and shoulders. I swear it also strengthens the muscles in your butt too, but maybe that’s just in my case because my butt keeps dropping and I have to keep tightening it to pull it back up into position.
Here’s the challenge:
 [paiddownloads id=”32″]
Do you think it sounds too hard? Don’t be a weenie. Check this out…
The current world record (according to Guinness World Records) for the plank position is 3 hours 7 minutes and 15 seconds, set in Newport, Kentucky on 20 April 2013 by George Hood.
Bless your heart, George, but with all due respect….are you frickin’ crazy?!
We can DO this!!
We’re starting next Monday, January 20th. Comment below if you’re in.
Motivation and Encouragement:
[label]Read[/label]We Can Do This! – 8 Trick for Holding a Plank Position Longer


“Put a coat on or you’ll catch cold.”
“You can’t go outside with wet hair, you’ll get sick.”
Are these old sayings true?
How can sickness have a season?
With all of us trying to dodge getting a cold or the flu (we’re borderline successful so far – it’s iffy, though), we do everything we can do avoid it. What are we actually trying to avoid?
Watch the video and you’ll learn more about getting a cold or the flu in three minutes than you will in a college course.
Okay, maybe a bit dramatic but there is a lot of great information.


Tawsha and I live on opposite sides of the United States, so a huge portion of our business communication is done through email. If you know either of us personally, you know we love what we do, have an idea a minute, and we do a lot of talking. This creates a ridiculous amount of work-related email. Then there’s the non-work related emails to each other, personal emails, subscription emails, …well, you see where I’m going here. Reading and processing 100+ emails a day left us little time to actually get any work done. We needed to find a solution. After some trial and error, we finally arrived at a system that really works for both of us.
Everyone uses email communication differently, and we all use different email programs. Although we use Microsoft Outlook, you should be able to use our process as a basic guide no matter what email program you use, and just tweak and adjust it where needed to make it work for you.
First of all, lets quickly clean out your inbox…
SEARCH AND DESTROY!
Your best friends are your Search and Find tools in your email program. Most of us get a lot of the same email notices that gunk up our inbox, like when someone repins your Pinterest pin. In Outlook, if you right click on a message, you can click the option “Find All From Sender”. It will pull up every message in your inbox from Pinterest. You can then click delete all. You could also type “Pinterest” in your email search bar to get the same list. Just repeat this process for all the messages you get a lot of…Facebook, Hometalk, your mom, that annoying person who forwards you jokes, etc, etc, etc. This is a great way to clear out a chunk of emails quickly. After you’ve cleared out as many as you can that way, you can then just individually go down the list of what’s left and delete them one by one.
The first time you completely clear out your inbox, it may take you awhile, but after you’ve done it this one time, if you follow our system below, you shouldn’t ever have to do it again. Do it, do it, do it! It will feel so good to have an empty inbox, even if you had to give up a Sunday morning to do it.
Now that you’ve finished, lets get you organized!
1. RETHINK THE PURPOSE OF YOUR INBOX

Think of and use your email inbox the same way you do your mailbox at home. Personal mail is delivered to your post office box or home mailbox around the same time each day. You retrieve the mail from your box, quickly scan through it, throw away the junk, respond to anything urgent or time-sensitive, then separate and distribute what’s left to it’s proper place. Right? After you’ve retrieved your mail each day, your mailbox is empty. That’s the goal we’re after for our email inbox.
2. RESTRICT YOURSELF
Determine how often you’ll check your email each day. Keep yourself to a time limit. Stick to it! Set a timer. As we discovered, email can become a huge time suck. Example: You roll out of bed, grab a cup of coffee, and open your email. You don’t feel like working, you’re nice and cozy, and you click on the Wetpaint Bachelor recap link your friend included in her email that you have to read. Once your done, (if no other stories catch your attention), you go back to your inbox and open an email from Michaels. They’re having a 50% off sale!! You’ve got to see if that scrapbook paper is on special…. An hour later, you haven’t responded to any work emails and you’re totally unprepared for the Skype meeting with your client who’s trying hard to focus on your cute sweater and not drop their eyes to the pajama pants below it. Ugh.
We process email three times a day and limit our time to 30 minutes. Make it known that you only check your email a few times a day, and if anyone needs your immediate response, suggest they send you a text or give you a call.
3. ADJUST ALERTS TO AVOID DISTRACTIONS

Turn off your audio and visual alerts. Some people have their social media accounts, such as Facebook, Twitter and Pinterest set to notify them by email when there is activity on their account. Most email programs offer visual or audible alerts to notify you of incoming email. Alerts are also available for your phones. So…if you have all these alerts activated, you’ve got yourself a whole lot of dinging, vibrating and notifications goin’ on that are screaming for your attention! If you’re tired or working on an extremely boring project, I don’t know about you, but it doesn’t take a lot to distract me and be checking out those incoming emails.
If you’d rather not turn your alerts off, another option is to change your email settings to only receive emails at a specific time, say during your lunch hour, or after your workday. Or… turn your automatic send & receive option off, which gives you complete control by allowing you to manually send and retrieve emails at times that are most convenient for you.
4. CREATE A FILING SYSTEM
Our goal is to empty our inbox. To accomplish that in the time we’ve allowed ourselves, we need to have someplace to efficiently organize those emails. We need to create folders. Just as our email inbox is the same as our mailbox, email folders are the same as the file folders in our filing cabinet. The number of folders you create and what you name them, is totally up to you. All that’s important is that you create an organization system that lets you quickly move emails from your inbox to folders that make sense to you. They can be simple:
- Need to Reply
- Read Later
- Add to Calender
or specific…
- Meeting Notes
- Applications|Resumes
- Upcoming Seminars
During each of your allotted email times, try to delete, respond or file your emails as quickly as you can, and with any of your remaining time left, visit any “need to reply” or “read later” folders you’ve created and process as many of those as you can. When your time’s up, GET OUT!
5. MAKE IT A RULE!

Most email programs let you create “rules”. Based on options you check, an email will automatically be sent to a folder you choose as soon as the email is received. For instance, I subscribe to some yarn and crochet newsletters. I don’t want them in my inbox because I don’t have time to read them during the day, and I also want to keep all my craft patterns, etc in one folder. I first created a folder named “Crafts”. I then created a “From” rule for each of these email subscriptions. So when I receive an email, like “From: Yarnspirations” it is automatically sent to my “Crafts” Folder. My OCD loves this because it keeps my inbox clear of emails that could easily distract me, and sorts them neatly in their designated folders for me to read when I’m done working. They are really, really easy to set up.
And that’s how it’s done.
Get to it…PURGE, PURGE, PURGE – you can DO THIS!
Image Credits:
Email
Mailbox
Woman Yelling
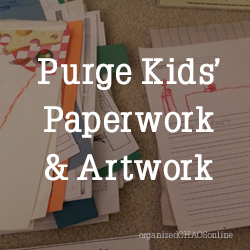

THERE’S PAPER EVERYWHERE!!! Oh my gosh, how many piles and stacks of paper do you have that are creating absolute chaos in your life? For a short amount of time, I had control of it but that was blown out of the water in a hot second.

Yep, that’s how my son’s schoolwork looks. What started out as a neat filing system near the door turned into a hot mess that I just threw into a box hoping to do something with. I didn’t want to lose anything so it’s all inside from August – January. My first organizational idea was something I saw on a “perfect” site. I call it that because it’s just not realistic. I wanted to have all the cute little cubbies and a filing system near my door but then life happened. My son bumped it, I needed more counter space to function in our kitchen and, really, things just got full.
On to the next idea.
Keep it simple.
Steps to Purging Paperwork:
-
See What You Have
-
Take Notes
-
Decide How to Store It or Display It
-
Create A System
-
Maintenance
-
Follow-Up
Before you even get started, set a time limit. If you know how much time you plan to spend on it, you’ll feel more in control and will get through it more quickly.

[paiddownloads id=”31″]
1. Prep & See What You Have
- Find an open space that won’t be interrupted while you work on your project. (I know, the chances of winning the lottery are better).
- Gather all the paperwork, homework, artwork, notes from school and any additional school-type papers into your open space.
- Sit down on the floor and start making piles. Each pile should signify an action. See image above and download printable if you want something quick.
- Sort everything no matter what it is. Create a new pile if you’d like. Each piece of paper should be living in a stack by the time your’e complete.
2. Take Notes
Whether you do this during your sorting process or go through afterwards, make little notes on each significant piece. Maybe it’s the first piece of art your son brought home or a certificate your daughter won for doing something silly. What was it that she did? With life as nutty as it is, we tend to forget the little things. These are the most important when we’re looking back.
3. Decide How To Store It or Display It
There are a lot of great ideas for storing paperwork and/or artwork. We’ve found some extremely quick, cheap and easy ideas.
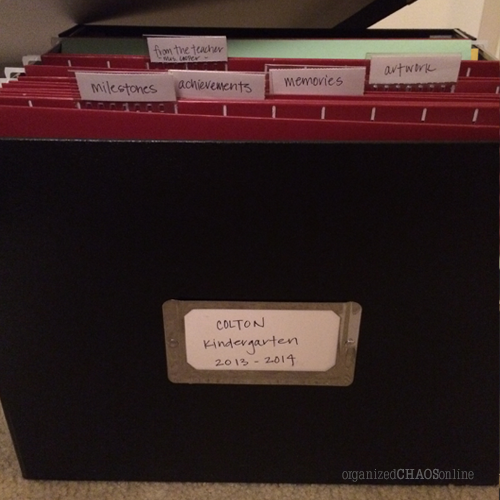
We filed my son’s paperwork in a simple snap-together bin from the office supply store. All we added was hanging file folders.
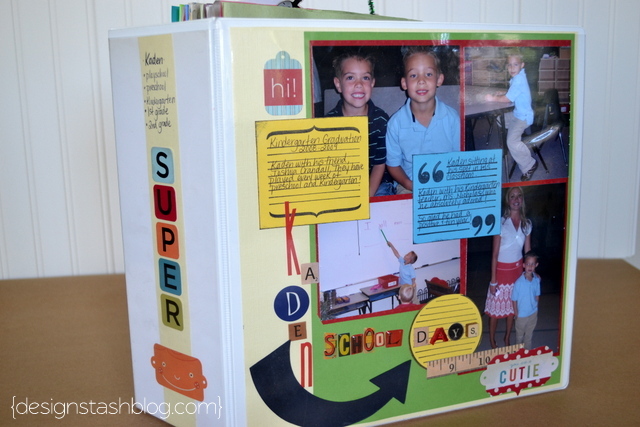
Brooke at the Design Stash created a Yearbook Binder. Um…how genius is this?!?! Tuck everything inside however it makes sense to you and decorate with your kids artwork.
Before filing things away, you may want to put that adorable artwork on display.
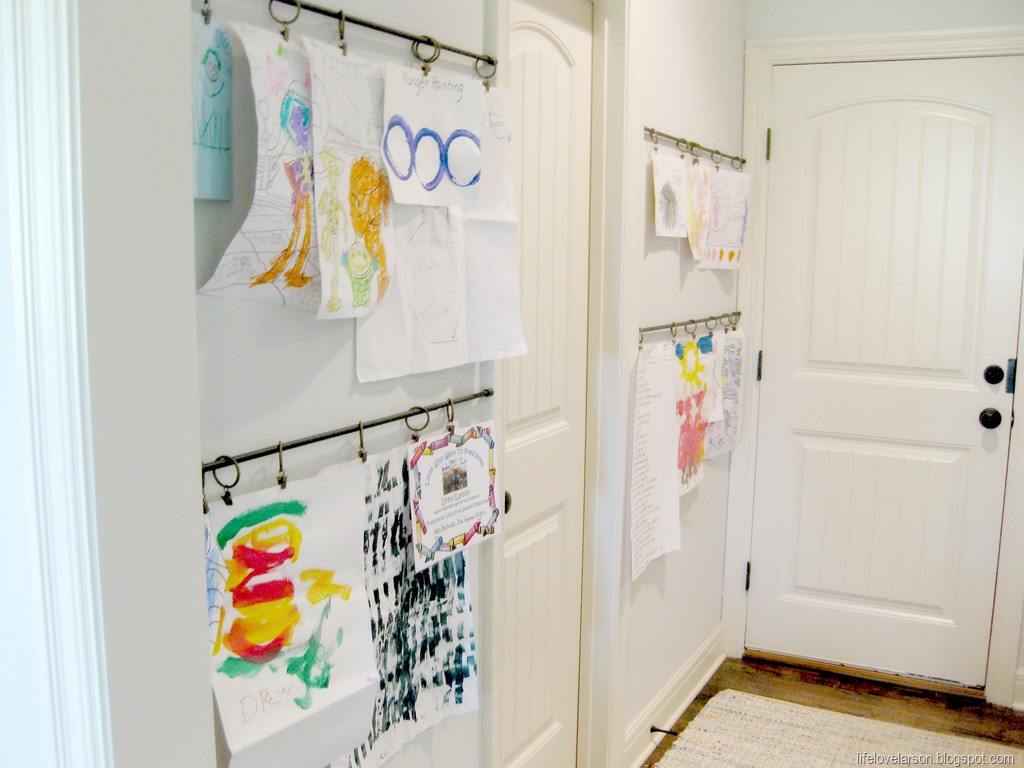
Andrea at Life.Love.Larson is genius! How about tension rods with curtain rings that have clips? We’ve seen this a variety of ways but none as great as seen on Life.Love.Larson.
Feeling a little Pinterest-y? Grab old picture frames, glue clothespins or clips to the top and spray paint them to make the frames pop.

via Pinterest
Or fill one frame with up to FIFTY pieces of art!

4. Create a System
So you don’t have to go through this process every six months, decide what works best for you to stay organized. Inform the rest of the family and get started. Our system works best when my son brings his backpack in the house, empties the papers on to the counter and I sort into open filing shelves. That’s the quick way. If I have a free minute (literally 60 seconds), I’ll run it upstairs and immediately put it in the corresponding file or recycle it.
5. Maintenance
Life gets in the way. Always. Be sure to circle back around if you see your pile start to grow. System or not, we tend to prioritize differently throughout the year and, all of a sudden, this paperwork isn’t at the top of our list like it is now.
6. Follow-Up
You know that stack of papers you labeled “Still Thinking/Unsure”? It’s time to see if you still feel this way. The end of the school year is a good time to do this follow-up process. After you have finished this final step, store the paperwork away.

January is National Get Organized Month. It’s time. This season my excessive-ness has finally gotten to me. I have purged my house hundreds of times in the past, but I still continue to hold on to certain items, or piles of items, for one reason or another. I’m a hugely sentimental person, so letting go of anything that is connected to a memory is really difficult for me. That’s my biggest purging downfall. I have finally become so tired of arranging and rearranging all my “stuff”, that I think I just may be able to put on those big girl panties, don a pair of those bad-ass yellow Playtex gloves, and overcome my biggest purging downfall by finally cutting that stuff loose.
I discovered I’m not alone in this. There are a lot of reasons that keep us from tossing the things we don’t use, and a majority of them are based on fear. Below is a list of the most common reasons people have given for hanging on to their stuff. I was surprised at how many of them I had heard myself give as an explanation for re-storing a box instead of chucking it.
Through the rest of this month, we’ll offer suggestions for ways you can overcome whatever emotion it is that’s keeping you from Cutting. The. Crap.
“I may need it some day”
“I’m afraid of running out of them”
“I may not be able to afford a new one when I need it”
“I’m going to do something with this”
“I’m saving it to put in my yard sale”
“I’m going to sell this on Etsy/eBay”
“It brings back memories”
“I’ve always loved this”
“But it still works”
“I paid a lot of money for it”
“I got it free”
“It’s perfect to put things in”
“It was on sale”
“It’s a collectible”
“Someday it will be worth something”
“It was a gift”
I know, right? Did you hear yourself? Are you ready to purge, but don’t know where to begin? Click HERE to get started.
To purge along with us this month, you can get email updates every time we post new information by creating a free Bloglovin’ account. It’s simple. Click HERE to get your updates.
If, at any time, you have questions, a special request or need more, please CONTACT US. We love hearing from you!
![New Year Statement Facebook Cover Images [FREE]](https://www.organizedchaosonline.com/wp-content/uploads/2013/12/new-years-fb-cover-image.jpg)
Ringing in the new year means so many things. We can look back at the year and remember the good times, take note of the lessons we learned and count the blessings we may not have noticed were blessings at the time.
The best part of ringing in the new year is the hope, the dreams and the goals we set for ourselves. When we wake up tomorrow, we have a chance to start fresh.
Mom and I want to thank you for being a part of our lives, for being a part of organizedCHAOSonline. We’ve learned so much from you, we are inspired by your feedback and we are honored to be welcomed into your life. We have some awesome plans for 2014 which include growth, an opportunity for more of you to become involved and even a chance to turn the spotlight on you.
More to come…
Until then, make your own statement. We’ve created some facebook cover images you can place on your own timeline. Show the world you mean business in 2014! This is YOUR year. The best is yet to come!
Click download below the image and upload to your facebook account.

[paiddownloads id=”24″]

[paiddownloads id=”25″]

[paiddownloads id=”26″]

[paiddownloads id=”27″]

[paiddownloads id=”28″]

[paiddownloads id=”29″]
Happy New Year, friends! Many well-wishes and tons of love!
Hey friends. We’re unofficially officially naming Coral our go-to fitness expert. If you haven’t read up on what she wrote before, start HERE. Short story: Coral is a mom of two who was sick of not being happy with her body. She didn’t do anything other than start moving…in her home…with nothing special at all. That, and better eating, resulted in the more toned version of her hot self.
Are you feeling lazy and big? Wanna be fit and thinner? Well, duh.
Without further ado, here’s Coral, who will give you the quick, cheap, and easy way to avoid the Jingle Bulge. She’s honest, she’s funny and she’s been in your shoes.
Tis the season y’all. This is the time of year that we are surrounded by all the good stuff, the parties, the snuggles on the couch watching holiday movies, the baking, the sweets, the booze etc. and it’s also the time leading up to New Year’s resolutions. So what do we do? We set goals for AFTER the holidays right? Well hot damn we can just work all this off in January? Oh joy! Now for me that means I will eat whatever I want, as much as I want, drink all the cocktails and chillax cause I’m going to have all this extra time and energy in the new year. Maybe I’ll even join a gym (Insert massive eye roll). This approach might be great for some. They might miraculously have surplus time and energy in January. It’s possible I’m sure but look at the mentality behind that. Binge until you are ready to cut it out completely? Isn’t that a bit like binge drinking & drugging before checking yourself into rehab? That’s pretty effed up but we’ve all done it.

photo credit: thegardenbuzz via photopin cc
If we want long lasting changes it can’t be seasonal. So I’d like to propose a challenge to end the year. Let’s start moving our asses now. I’m not implying that we shouldn’t partake in the festivities so don’t get me wrong. This isn’t an all or nothing cold turkey kind of venture. There must be balance. We can totally party and enjoy traditions but just because we’re going to have Christmas cookies and egg nog with Aunt Sally on Saturday doesn’t mean we need to stuff our pie holes with cookies all damn week. We gotta earn it so we can enjoy guilt free. Plan ahead, eat well leading up to those events and get in your workouts. It’s possible.
Believe it or not there are people out there that love to workout. I however am most definitely not one of those people. I still search for excuses and need to try like hell to fight the urge to justify letting myself off the hook so I need to get creative with how I fit it in. Just like you I’m busy, I’m tired, I don’t want to give up time with my family and I need my social life. All of these become more amplified during the holidays. It’s exhausting but I feel totally empowered when I can make it work. Even if I finish a workout at 10:45 at night because I procrastinated all freaking day I still feel like I’ve conquered the world. So how can you fit a workout in with all this shit going on?

Got kids?
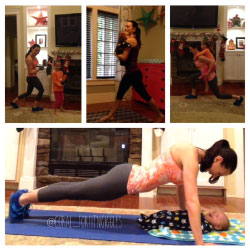
They make for awesome weights and workout buddies. It’s fun for them and a killer workout for you. I have a pretty light weight (my 10 week old) and a heavy weight (my 6 year old) & it’s pretty easy to incorporate exercise into our play. At this point rocking my son to sleep is impossible. He wants squats!

Got a couch?
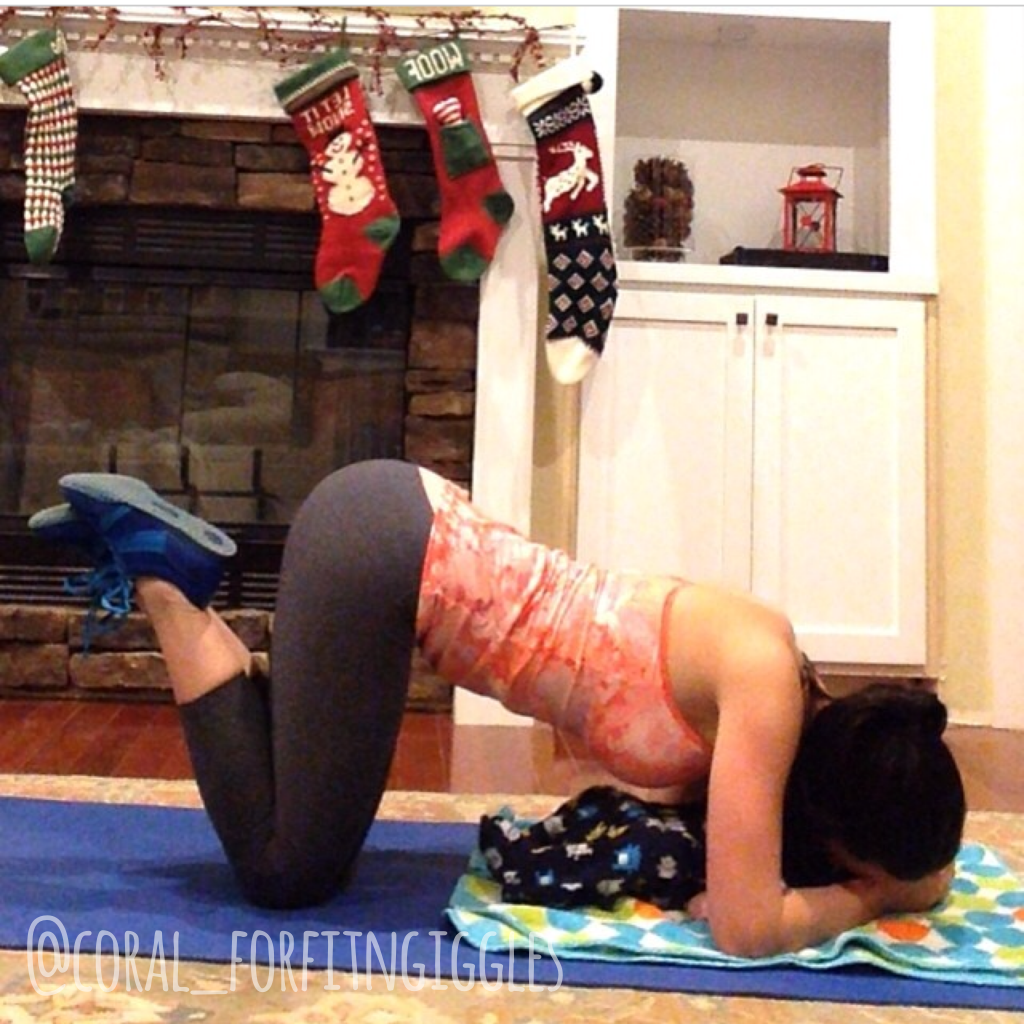
I’ve been asked how I keep my arms toned. Well, truth is I work upper body either standing in front of or while camped out on the couch watching the tube and I’ve put in A LOT of hours like that. I kinda feel like a lame ass even admitting that but there are days when I get home from work and just need to sit down and veg so I plunk my ass down with a set of dumbbells and bust out variations of bicep and shoulder moves.
 Got a smart phone?
I know y’all can afford free & I know that y’all can carve out at least 15 minutes of your day to get your heiny moving. You have got to download the Nike Training Club app. There are tons of options in this app. Seriously tons. There are full workouts for cardio, strength, HIIT etc. with video tutorials on each and every move but when I’m super swamped I’ll look under the “Get Focused” tab to find a 15 minute workout and squeeze that shit in. They are actually pretty intense and although 15 minutes a day might not get you ripped it will keep you in the habit of staying active. You can add in the longer workouts come January when you’ve got all that extra time laying around *wink wink*. Until then get your 15 minutes in before heading out to the next holiday party.

 That’s it, guys. Easy peasy lemon squeezy. So why not start the new year feeling good about the changes you’ve already made eh? Let everyone else make resolutions while you continue towards your goals. I mean shit, if you can start this during the holidays you’re already a freaking rock star.


Do you find this to be inspiring or overwhelming?
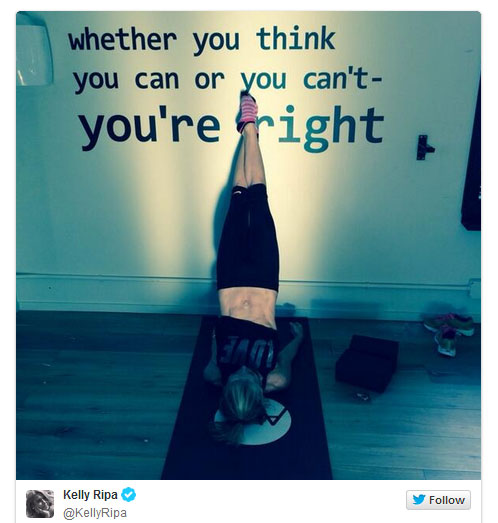
A lot of us moms look down at our lower stomach pooch (or more – let’s be honest) and dream of the days where we could rock a pair of pants without that ever-present waist roll from leggings, tights, you-choose-your-pant.
Kelly Ripa hasn’t ever been big, per se, but she has had years where she struggled with her weight, whether it was physical or emotional. We’ve all been there at some point, haven’t we? Instead of just letting it go, she did something about it.
You can feel how you want about the always energetic Kelly Ripa but you can’t deny her hard work and determination. No, you can’t. Nope. I won’t hear of it.
Kelly goes to the gym 7 days a week, she has a ton of money, special classes she takes, access to the best foods (and even someone to prepare it if she wants). It hardly seems fair to compare ourselves to someone who has that kind of privilege.
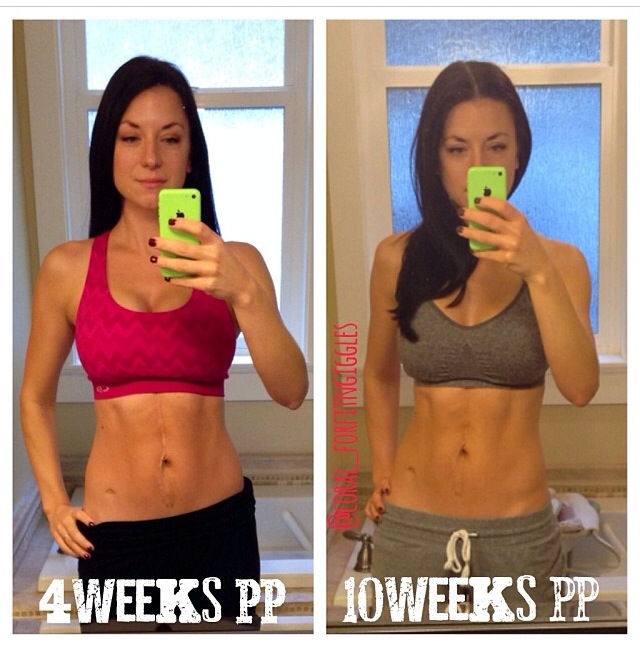
What if I told you that I knew someone with a body JUST as incredible (actually, more healthy-looking), has no access to any high end food, diet plans, trainers and consultants. Oh, and this person has two kids and an aversion to the kitchen. The pics say “PP” which is referring to “postpartum”. Yep, that second baby was JUST born!
Now we’re talkin’!
This is Coral and she is our go-to QUICK, CHEAP and EASY fitness friend. We’re busy, we don’t have gobs of money and, if we’re being truthful, the whole thought of trainers, special plans, babysitters to go to the gym and all that business is just too much some days. Most days. Have I mentioned that Coral DOES NOT like to work out. Thank goodness, someone who gets it.
via Instagram @coral_forfitngiggles
Follow us on Bloglovin’ to read the upcoming post by Coral which will give you a little inspiration to start your thin-down before the New Year. Wouldn’t you rather just sit on the couch? Perfect. The workout includes the couch.
If you’re not familiar with Bloglovin, it’s a place where you can create a free account to have your favorite websites send you updates via email at the time and frequency you choose. No spam, just goodness. This is where you do it: CLICK RIGHT HERE.

I love to crochet. Nana taught me when I was really little. Back then I just made crochet chains. Loooooong crocheted chains. I continued to crochet through the years making lots and lots of afghans, but got bored with those. Seriously, how many afghans do you really need? Unfortunately my pattern reading skills are fair at best, and my knowledge of crochet stitches beyond the basics are limited, so I’ve really never advanced past beginner projects.
My sister mentioned she’d love to have some crocheted snowflakes for her tree. The ones that had been passed down through the family that she’d been putting on her tree in the past were falling apart. I decided there’s no time like the present to advance my crocheting skills, and went in search of some snowflake patterns. There are a ton of free patterns out there, but good LORD! I can’t tell you how many I started, then ripped out.

After a lot of frustration, I finally landed on five that worked for me. My end result may not look perfect, but I felt pretty accomplished when I had finished. For the most part they were really easy to do, and my sister loved them! They don’t take long, and once you’ve got the pattern down, you can whip through them pretty quickly. They’d make a great handmade Christmas gift. I’ve shared the instructions with you below.
Good luck and happy crocheting!
 [spacer]
*For all of the snowflakes below, I used white 100% Cotton Crochet thread – size 3 weight 1 (Super Fine), and a Size 8 (1.50mm) crochet hook*
[row][column size=”1/2″]
Snowflake #1

[/column] [column size=”1/2″][spacer]
Instructions:
Ch 6, join with a sl st to form ring
- Rnd 1: Ch 1, 12 sc in ring. Sl st in first sc.
- Rnd 2: Ch 1, sc in first st, (ch 3, sc in next sc) 11 times; hdc in first sc to join and form last loop – 12 ch-3 spaces
- Rnd 3: Ch 1, sc over hdc, *(2 dc, ch 3, 2 dc) in next space**, sc in next space; repeat from * around, ending last repeat at **; join with sl st in first sc.
- Rnd 4: Ch 4, sl st in same st as joining, *ch 2, (sc, ch 3, sc, ch 5, sc, ch 3, sc) in next ch-3 space, ch 2**, (sl st, ch 4, sl st) in next sc; repeat from * around, ending last repeat at **; join with sl st in sl st of last round. End.
[/column] [/row]
 [row][column size=”1/2″]
Snowflake #2

[/column] [column size=”1/2″][spacer]
Instructions:
Ch 8, sl st in first ch to form ring.
- Rnd 1: Ch 7dc in ring, (ch 5, dc in ring) 4 times, ch 5, sl st in 2nd ch of ch 7–6 sps.
- Rnd 2: Sl st in next lp, ch 4 (counts as 1 tr); holding back last lp of each tr on hook, make 3 tr in ch-5 lp, yo and through 4 lps on hook (4 tr cluster), *ch 9, 4 tr cluster in next lp, repeat from * 4 times, ch 9, sl st in top of first cluster.
- Rnd 3: * Ch 7, sl st in 4th ch from hook for picot, ch 9, sl st in 4th ch from hook for picot, ch 3, sl st in top of cluster; in ch-9 lp work sc, hdc, 4 dc, hdc, sc, sl st in top of next cluster, repeat from * around, end sl st in sl st at beg of rnd. End.
[/column] [/row]
[row][column size=”1/2″]
Snowflake #3

[/column] [column size=”1/2″][spacer]
Instructions:
Ch 7, sl st in first ch to form ring
- Rnd 1: Ch 6, (dc in ring ch 3) 7 times, sl st in 3rd ch of ch 6–8 sps.
- Rnd 2: Sl st in next sp; ch 3, 2 dc in sp, (ch 3, 3 dc in next sp) 7 times, ch 3, sl st in top first ch 3.
- Rnd 3: Ch 7, sk 1 dc, dc in next dc, * ch 4, dc in next dc, ch 4, sk 1 dc, dc in next dc, repeat from * around, end ch 4, sl st in 3rd ch of ch 7.
- Rnd 4: Sl st in first sp, ch 4, 2 tr in same sp, ch 4, sc in 4th ch from hook for picot, sl st in last tr, 2 tr in same sp, ch 3, sc in next sp, *ch 3, 3 tr, picot, 2 tr in next sp, ch 3, sc in next sp, repeat from * around, end ch 3, sl st in top of ch 4. End.
[/column] [/row]
[row][column size=”1/2″]
Snowflake #4

[/column] [column size=”1/2″][spacer]
Instructions:
Ch 6, join with sl st to form ring
- Rnd 1: Ch 5 (counts as 1 tr and 2 ch), (1 tr into ring, 2 ch) 5 times, sl st to 3rd of 5 ch at beginning of rnd.
- Rnd 2: Sl st into first ch sp, ch 3 (counts as 1 tr), tr4tog into same ch sp, (ch 7, tr5tog into next ch sp) 5 times, ch 3, 1 dtr into top of first tr4tog.
- Rnd 3: Ch 1 (does not count as st), 3 dc into ch sp partly formed by dtr at end of previous rnd, (ch 9, 3 dc into next ch sp) 5 times, ch 8, 1 dc into top of first dc.
- Rnd 4: Ch 3 (counts as first leg of first tr3tog), tr2tog working first leg into center dc of first 3 dc group and second leg into first ch after 3 dc group, *ch 2, miss 1 ch, 1 tr into next ch, ch 2, miss 1 ch, (1 tr, ch 3, 1 tr) into next ch, ch 2, miss 1 ch, 1 tr into next ch, ch 2, miss 1 ch, tr3tog working first leg into next ch, second leg into central dc of next 3 dc group, and third leg into first ch after 3 dc group; rep from * 4 more times, (ch 2, miss 1 ch, 1 tr into next ch) twice, 18 ch, 1 dc into 16th ch from hook, 1 dc into next ch, 1 ch, 1 tr into same ch as last tr, ch 2, miss 1 ch, 1 tr into next ch, ch 2, miss 1 ch, sl st to top of first tr2tog. End.
[/column] [/row]
[row][column size=”1/2″]
Snowflake #5

[/column] [column size=”1/2″][spacer]
Instructions:
Ch 7, sl st in first ch to form ring
- Rnd 1: (Sc in ring, ch 2, dc in ring, ch 2) 6 times. Sl st in first sc.
- Rnd 2: Sl st in first 2 ch, sl st in dc, ch 3, dc in same dc, (ch 3, sc in next sc, ch 3, 2 dc in next dc) 5 times, ch 3, sc in next sc, ch 3, sl st in top of first ch 3.
- Rnd 3: Ch 3 (counts as 1 dc), dc in next dc, (ch 4, sc in next sc, ch 4, dc in each of 2 dc) 5 times, ch 4, sc in next sc, ch 4, sl st in top of ch 3.
- Rnd 4: Ch 3, dc in next dc, (ch 5, sc in next sc, ch 5, dc in each of 2 dc) 5 times, ch 5, sc in next sc, ch 5, sl st in top of ch 3.
- Rnd 5: Ch 3, dc in next dc, (ch 7, sc in next sc, ch 7, dc in each of 2 dc) 5 times, ch 7, sc in next sc, ch 7, sl st in top of ch 3.
- Rnd 6: Ch 3, dc in next dc, (ch 9, sc in next sc, ch 9; holding back last lp of each dc, dc in each of the next 2 dc, yo hook and through 3 lps on hook) 5 times, ch 9, sc in next sc, ch 9, sl st in first dc. End.
[/column] [/row]
Finishing Snowflakes
To stiffen snowflakes, mix one part glue with one part water in a medium bowl. Stir until smooth. Submerge a snowflake in the mixture, then squeeze out excess liquid, lay the snowflake on a towel or corkboard. Shape it and pin it into place. Sprinkle with white glitter and let dry.
If you have any questions, you can comment below, or feel free to contact us by email: inbox (at) organizedchaosonline (dot) com.